Vintage Pen Filling Systems
Fountain Pen Filling Systems: Overview of How They Work
Thanks to and copyright Richard Binder of RichardsPens.com (This page revised May 13, 2016)
Since its inception, the fountain pen has been fitted with many different filling systems, including some that are amazingly simple and others that are intriguingly complex. This article, by Richard Binder, describes and illustrates many of the systems that have been used. The illustrations are schematic in nature and do not represent any specific actual pen.
The descriptions include filling instructions. Except for the Sheaffer Snorkel, all systems whose filling requires that you immerse part of the pen into the ink also require you to clean away the excess ink after filling. Each system’s filling instructions include a link to display a pop-up window containing cleaning instructions.
List of Filling Systems

To fill: Remove blind cap. Immerse nib and part of section into ink. Press and release plunger four times, waiting three seconds at the top of each stroke. Remove pen from ink and clean. Replace blind cap.

To fill: Remove barrel. Immerse nib and part of shell into ink. Press and release pressure bar several times until no more bubbles appear, waiting three seconds after each squeeze. Some pens have instructions imprinted on the sac guard to indicate the number of squeezes required, but looking for bubbles is a more positive indication. Remove pen from ink. Squeeze three or four drops back into the bottle and release the pressure bar in order to suck excess ink from the nib area into the collector. Clean. Replace barrel

To fill: Immerse nib and part of section into ink. Cover end of barrel with your mouth and blow gently but with sufficient pressure to deflate sac. Remove your mouth from the barrel. Wait five seconds. Deflate sac again, wait five seconds longer. Remove pen from ink and clean.
Design: Mechanical squeeze of bulb at end of barrel.

To fill: Remove blind cap. Immerse nib and part of section into ink. Squeeze and release bulb several times until no more bubbles appear, waiting three seconds after each squeeze. Remove pen from ink and clean. Replace blind cap. (On some pens, there is no blind cap as such. Instead, the barrel unscrews to reveal a clear reservoir with the bulb at its end.)
Design: Mechanical ink-sac squeeze. A button at the end of the barrel bends a spring-metal pressure bar to squeeze the sac laterally

To fill: Remove blind cap. Immerse nib and part of section into ink. Press button firmly until it stops, then release. Wait five seconds. Press and release button again, wait five seconds longer. Remove pen from ink and clean. Replace blind cap
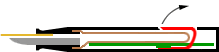
Parker 61. Design: Capillary action. An internal reservoir (the capillary cell) contains a sheet of plastic that has been perforated, embossed with a 3-D pattern resembling safety tread, and rolled up. The holes allow ink to ooze between the rolled-up layers, and the embossed pattern maintains space between the layers. In the center, running the entire length of the capillary cell, is the feed. The cell’s housing is metal, with a Teflon coating to repel ink easily. When the pen is not being filled, a spring-loaded valve in the back end of the barrel seals the end of the cell.

To fill: Remove barrel. Immerse end of capillary cell into ink. (Do not attempt to remove capillary cell from pen.) Allow to stand for 60 seconds. Remove pen from ink and clean. Replace barrel.
Design: Replaceable ink reservoir. A small nipple, usually of metal, is placed at the back of the section assembly to pierce a hole in the end of a pre-filled sealed removable cartridge. A converter that includes the reservoir and a filling system can be installed in place of a cartridge. The most common converter design uses the piston system. (Some makers also offer a modified version with a sliding tab instead of the usual twist knob; this is essentially a syringe filler.) Squeeze-type converters resemble a Squeeze Bar filler but lack the breather tube that is found in some versions of the latter.

To fill: Remove or slide barrel as required. Remove cartridge or converter. Install converter or new cartridge. If you have installed a converter, fill pen as indicated. Replace barrel. For the Namiki/Pilot Vanishing Point, you must remove the back half of the pen and then remove the sliding nib carrier assembly from the front half. When filling a Vanishing Point from a bottle, immerse the entire nib and a short portion of the carrier itself.
Chilton proprietary. Design: Pneumatic ink-sac compression. There are three variations of the Chilton system. In the first version, the barrel slides on an airtight seal over a metal tube that is fixed to the section. A small hole is at the back end of the barrel. When the barrel is extended, the hole covered, and the barrel returned to its rest position, air is allowed into the barrel through the hole and then compressed, squeezing the sac. When the hole is uncovered, the trapped air is released and the sac draws in ink by resuming its normal shape. In the second version, the barrel is fixed and the metal tube slides back and forth within the barrel. A blind cap is attached to the tube to give the user a suitable “knob” to operate. This design is functionally the same as that of Sheaffer’s Touchdown models. The third version resembles the second but has no hole in the blind cap. Instead, a valve opens and closes a concealed air passage. Operation is the same as for the second version except that there is no need for the user to create and then release a seal by covering and uncovering a hole; pressure is released automatically as the aluminum tube nears the end of its travel. The third version was not successful because the valve proved unreliable. The first version is illustrated here.

To fill: First and second versions: Extend barrel or tube, leaving hole uncovered. Immerse nib and part of section into ink. Cover hole and press down smoothly to return barrel to its rest position. Uncover hole. Wait 10 seconds. Remove pen from ink and clean. Third version: Same as second version except that there is no hole for you to cover and uncover
Design: Mechanical ink-sac squeeze. A metal pressure bar, located beneath a slotted hole in the side of the barrel, squeezes the sac laterally when depressed by insertion of a coin or similar object into the hole. Some makers of coin fillers included their own “coin” discs with their pens.

To fill: Insert a coin to depress pressure bar. Immerse the nib and part of the section into ink. Remove coin. Wait five seconds. Depress pressure bar again, wait five seconds longer. Remove pen from ink and clean.
Conklin proprietary, later used on Japanese pens imported by Spors et al. Design: Mechanical ink-sac squeeze. A metal pressure bar, attached to a metal crescent protruding through a slotted hole in the side of the barrel, squeezes the sac laterally. A lock ring rotates around the barrel. Rotated one way, the ring “locks” the crescent against being depressed; rotated the other way, the ring “unlocks” the crescent to be depressed. See also Hump.

To fill: Rotate lock ring to position slot in lock ring under crescent, unlocking the crescent. Press crescent. Immerse nib and part of section into ink. Release crescent. Wait five seconds. Press and release crescent again, wait five seconds longer. Remove pen from ink and clean. Rotate lock ring to lock crescent.
Dunn-Pen proprietary, later used on Omas Lucens and Gate City New Dunn Pen. Design: Pump. A plunger draws in ink when raised and expels air through the breather tube when depressed. The downstroke expels air instead of ink because the air in the barrel can travel down the breather tube more easily than ink can flow down the feed channels. The “piston head” is only a guide and a retainer to keep the plunger from being pulled out of the barrel, and it does not seal against the barrel. In order to facilitate the flow of ink from one side of the head to the other, the head in some pens is relieved to give it a square shape, while in other pens there are holes in the plunger shaft near the hea

To fill: Unscrew the “Little Red Pump-Handle” (the red knob) until it moves freely. Immerse nib and part of section in ink. Pull the knob out to extend the plunger, drawing ink into pen. Wait two seconds. Press knob down, smoothly and fairly rapidly, to expel air. Repeat extending and pressing the knob until no air bubbles appear during the downstroke. Remove pen from ink, screw the knob down, and clean
Design: Direct filling into barrel. Most eyedropper fillers unscrew, usually at the joint between section and barrel, and ink is dripped into the pen with an eyedropper. In “safety” pens with retractable nibs, the ink is dripped into the opening that is left by the retracted nib.


To fill: Non-retracting pens: Hold pen nib uppermost. Unscrew section assembly from barrel (upper image) and set it aside on a piece of waste paper. Use an eyedropper to fill barrel with ink to about 1∕4″ (6 mm) from opening. Replace section assembly, being sure to screw it tightly so that it will not leak. Clean off any ink that has gotten on exterior surfaces. Retracting pens: Hold pen nib uppermost. Retract nib (lower image, illustrated by Moore’s Non-Leakable). Use an eyedropper to fill barrel with ink just until you can see ink beginning to fill the opening. Clean off any ink that has gotten on exterior surfaces.

To fill: Open lever and swing it over to depress pressure bar. Immerse nib and part of section into ink. Release lever. Wait five seconds. Press and release lever again, wait five seconds longer. Remove pen from ink and clean. Restore lever to rest position.
Design: Mechanical ink-sac squeeze. A metal pressure bar, attached to a metal hump protruding through a slotted hole in the side of the barrel, squeezes the sac laterally. In some versions (variations of the Crescent filler, sufficiently different to avoid patent infringement), a lock ring rotates around the barrel. Other versions have a knob at the back end of the barrel. Rotated one way, the ring or knob “locks” the hump against being depressed; rotated the other way, the ring or knob “unlocks” the hump to be depressed. (Shown here is the Welty “Wawco” lock-ring filler.) See also Crescent.

To fill: Rotate lock ring or knob to release the hump. Press hump. Immerse nib and part of section into ink. Release hump. Wait five seconds. Press and release hump again, wait five seconds longer. Remove pen from ink and clean. Rotate lock ring or knob to lock hump.
Waterman proprietary. Design: A Rube Goldberg bulb filler; mechanical squeeze of bulb at end of barrel. A metal pressure bar, located beneath a slotted hole in the side of the barrel, squeezes the bulb laterally. A two-piece jointed pivoting lever is mounted in the slot. Lifting the lever’s longer end raises the first arm of the lever to 90°, at which point it engages the second arm. Lifting further depresses the other end of the second arm to push against the pressure bar.

To fill: Raise first arm of lever to its open position. Immerse nib and part of section into ink. Push lever further until it stops, and release. Wait three seconds. Repeat until no more bubbles appear. Remove pen from ink and clean. Return lever to closed position.
Design: Mechanical ink-sac squeeze. A metal pressure bar, located beneath a slotted hole in the side of the barrel, squeezes the sac laterally. A pivoting lever is mounted in the slot, with its pivot about 1∕3 of the distance from one end to the other. Lifting the lever’s longer end depresses the shorter end to push against the pressure bar.

To fill: Depress pressure bar by lifting lever to 90° angle (straight outward from the barrel). If the lever hits a stop before reaching 90°, do not force farther. Immerse nib and part of section into ink. Release lever. Wait five seconds. Lift and release lever again, wait five seconds longer. Remove pen from ink and clean. Pens with breather tubes, such as Eversharp models from the 1940s and 1950s, require multiple operations of the lever; keep lifting and releasing until no air bubbles appear when you lift.

To fill: Rotate barrel-end knob counterclockwise against the resistance of the twisting sac until it stops. Do not force farther! Immerse nib and part of section into ink. Rotate knob clockwise until it stops. Wait five seconds. Remove pen from ink and clean.

To fill: Expose hole if it is protected. Insert matchstick to depress pressure bar. Immerse nib and part of section into ink. Remove matchstick. Wait five seconds. Depress pressure bar again, wait five seconds longer. Remove pen from ink and clean. Cover hole if indicated.

To fill: With pen over a sink, rag, or other ink catcher, turn piston knob counterclockwise until it stops. Immerse nib and part of section into ink. Turn piston knob clockwise until it stops. Repeat this cycle once to displace air trapped by the first cycle. Remove pen from ink. Clean pen. (Many sources recommend that you turn the piston counterclockwise enough to bleed out two or three drops and then turn it clockwise again until it stops, but for many pens this technique does not clear excess ink from the feed satisfactorily. You still need to swaddle the nib and feed.) Caution: the piston on the Soennecken 111 and 222 is latched so that it must be pulled slightly before it will turn. Once freed from the latch, it can be released and turned normally. When returned to its rest position, it clicks as the latch reëngages.

To fill: Unscrew blind cap. Immerse nib and part of section into ink. Pull up on blind cap to withdraw plunger as far as it will go. Press blind cap down smoothly and firmly, but not too quickly, to drive plunger down in barrel. (If pen is dry, begin by pulling plunger up a short distance and pushing down again. Make two or three short strokes like this to draw in a small amount of ink that can lubricate the barrel wall, then make the full stroke.) Wait five seconds. Remove pen from ink and clean. Screw blind cap to secure plunger.

To fill: Immerse nib and part of section into ink. Pull and release saddle bar two times, waiting three seconds between pulls. Remove pen from ink and clean.
To fill: Grasp the end of the operating lever that is closest to the nib and and raise it outward from the barrel. Immerse nib and part of section into ink. Release lever. Wait five seconds. Lift and release lever again, wait five seconds longer. Remove pen from ink and clean.
Design: Mechanical ink-sac squeeze. The sac is partially exposed through an opening in the side of the barrel. A pressure bar spans the opening. A movable sleeve covers the opening; in some pens, the sleeve travels along the barrel of the pen to expose the opening, while in others it rotates through part of a turn. Depressing the pressure bar with a thumb or finger squeezes the sac laterally. See also Squeeze Bar.

To fill: Move sleeve to expose opening. Immerse nib and part of section into ink. Press and release pressure bar two times, waiting three seconds between squeezes. Remove pen from ink and clean. Move sleeve back into position.
Design: Mechanical ink-sac squeeze. A pressure bar shaped much like an ordinary eating spoon is pivot-mounted at the end of the barrel so that the spoon’s “handle” extends alongside the sac and its “bowl” is a small toggle that is exposed by removal of a blind cap. Pressing the toggle laterally levers the pressure bar against the sac to squeeze it. The Red Band Parker “51” is a variant of this design in which a plunger/button activates the toggle.

To fill: Remove blind cap. Immerse nib and part of section into ink. Press and release toggle two times, waiting three seconds between presses. Remove pen from ink and clean. Replace blind cap
Design: Mechanical ink-sac squeeze, with or without breather tube; differs from Aero-metric in that a squeeze bar filler’s breather tube, if present, lacks the tiny lateral hole that permits air-pressure equalization in the sac. The sac is contained within a metal sac guard to which a spring-steel pressure bar is affixed. The barrel conceals the filler during use and must be removed to expose it for filling. Depressing the pressure bar with a thumb or finger squeezes the sac laterally. See also Sleeve. There are also hybrid sleeve/squeeze-bar pens in which either all of the barrel or its back half slides on a metal sac guard instead of being removable.

To fill: Remove barrel. Immerse nib and part of section into ink. Press and release pressure bar two times, waiting three seconds between squeezes. Remove pen from ink and clean. Replace barrel.

To fill: Remove blind cap. With pen over a sink, rag, or other ink catcher, push piston in until it stops. Immerse nib and part of section into ink. Pull piston out until it stops. Remove pen from ink. Clean pen. Replace blind cap.

To fill (Touchdown or TIPdip): Unscrew blind cap. With pen over a sink, rag, or other ink catcher, pull blind cap out to extend Touchdown tube. The pen may expel a small amount of ink as you do this. Do not immerse any portion of the pen in ink while extending the Touchdown tube! Immerse nib and part of section (Touchdown), or just tip half of nib and feed (TIPdip), into ink. Press down smoothly on blind cap, returning Touchdown tube to its rest position. Wait 10 seconds. Remove pen from ink and screw blind cap to secure Touchdown tube. Clean.
To fill (Snorkel): Unscrew blind cap, pushing gently toward barrel while unscrewing to ensure that Snorkel tube, which might be a little sticky, extends fully; and turn blind cap until you feel a soft but distinct “click.” With pen over a sink, rag, or other ink catcher, pull blind cap out to extend Touchdown tube. The pen may expel a small amount of ink as you do this. Do not immerse any portion of the pen in ink while extending the Touchdown tube! Immerse tip of Snorkel tube into ink. (If filling a completely dry pen, immerse nib and part of section.) Press down smoothly on blind cap, returning Touchdown tube to its rest position. Wait 10 seconds. Remove pen from ink and screw blind cap to secure Touchdown tube and retract Snorkel tube. Do not clean the ink from the Snorkel tube; any ink remaining on the exterior will assist in restarting capillary action to direct ink to the nib tip. (If you were filling a completely dry pen and immersed the nib, clean it after retracting the Snorkel tube.)

To fill: The knob should indicate which way to turn it. With pen over a sink, rag, or other ink-catcher, turn knob in indicated direction until you feel it hit a stop. Do not force. Immerse nib and part of section into ink. Turn knob the other way until it stops. Wait five seconds. Remove pen from ink and clean.

To fill: Remove blind cap. Immerse nib and part of section into ink. If the pen has a Lockdown filler, the spring-loaded plunger is latched in the depressed position; in this case, press on the end of the plunger, twisting the plunger very slightly counterclockwise, and release. The plunger should extend. Press quickly and release. Parker instructions said to press and release the plunger 10 times, waiting one second at the top of each stroke; but I find that some Vacs require more strokes, and a one-second wait is not always long enough to allow the pen to draw as much ink as it will. Continue pressing and releasing until no more bubbles appear on the downstroke, pausing two or three seconds at the top of each stroke. If the pen has a Lockdown filler, press one final time and twist the plunger slightly clockwise to latch it. Remove pen from ink and clean. Replace blind cap. (For a Vacumatic-filling “51”, remove the pen from the ink before releasing the plunger on the final stroke in order to suck excess ink from the nib area into the collector.)
The information in this article is as accurate as possible, but you should not take it as absolutely authoritative or complete. If you have additions or corrections to this page, please consider sharing them with us to improve the accuracy of our information.
2016 RichardsPens.com